DID authentication - a challenge–response authentication model based on DIDs
A challenge–response authentication is a family of protocols in which one party presents a question (“challenge”) and another party must provide a valid answer (“response”) to be authenticated. 10
DID Auth is a protocol that allows asking the controller of an account to sign a random message, thus demonstrating control of the account at the time of the question. This protocol used as a login method checks that the user controls the account at the time of access to the application.
Additionally, it allows the application to request specific data at the time of registration, for example the user’s email or phone number. These requested data follow a specific standard, which allows the client to provide it in a unified way and even cryptographically signed by a third party. This means that the application can ask the user for verifiable credentials, identifying them by their type in a unique way.
Table of contents
State of the art
Nowadays, authentication is handled in a centralized way. Most applications delegate the process of authenticating users to third-party services, like OIDC, relaying the authenticity of that information on those services providers. The users’ information is not controlled by the users theirselves, the third-party services control it.
We believe users are not going to trust their private information to third-parties services anymore, nor applications will trust in data provided by centralized services. In addition, users will ask to disclose the minimum amount of information they can. This is the Web 3.0.
Motivation
The motivation of this protocol is to provide user centric registration and authentication mechanisms to be used by services of the web 3.0 considering:
- Users are identified by their unique Decentralized Identifiers -DID- and blockchain addresses
- Users hold their private information in user-centric services, or even fully-decentralized platforms
- Services may require specific user’s information to grant access to the service
- Services verify the integrity and authenticity of the information shared by the user
- Services perform different logic depending on the designed authentication model (we call this the business logic)
- Users can provide services all required information with no need of third-party services
- Services and clients in this protocol share a standard way to name particular type of data - we call this standard schemas
We identify two main type of services: permissioned services, those which require user to provide certain information to access it, and open services, which do not require extra info apart from the user’s blockchain address.
This protocol allows services to prove that the user is in control of their Decentralized Identifier -DID- 2 (thus, their blockchain account) and, optionally, enables the application require the user to share specific private information associated to their account (their Verifiable Credentials 7 ), in order to register them performing a custom business logic, enabling the service to verify that the shared information has been issued by reliable entities.
It is designed to:
- Register users by requesting them to share specific information that can be verified - this information can be used in business logic to grant or deny access
- Allow the user to opt-in to share their information - it is a user-centric protocol, the user decides wether to share the information or not
- Authenticate a user by proving they control a specific DID
- Provide an access token to the user that can be reused over time - wallet systems usually request user action to sign messages. Lowering this actions improves the user experience. Enabling reusing access token reduces the amount of signatures required.
This protocol was inspired by:
- CHAP11 authentication protocol
- OAuth 2.0 Authorization Framework13 .
- Decentralized Identifiers (DIDs) v1.0 2 .
- W3C Verifiable Credentials model 7 .
- uPort selective disclosure implementation
- W3C Verifiable Credentials JSON Schema Specification 12
Initially, it is designed to use HTTPS as the message transport layer, but it can be ported to a different one.
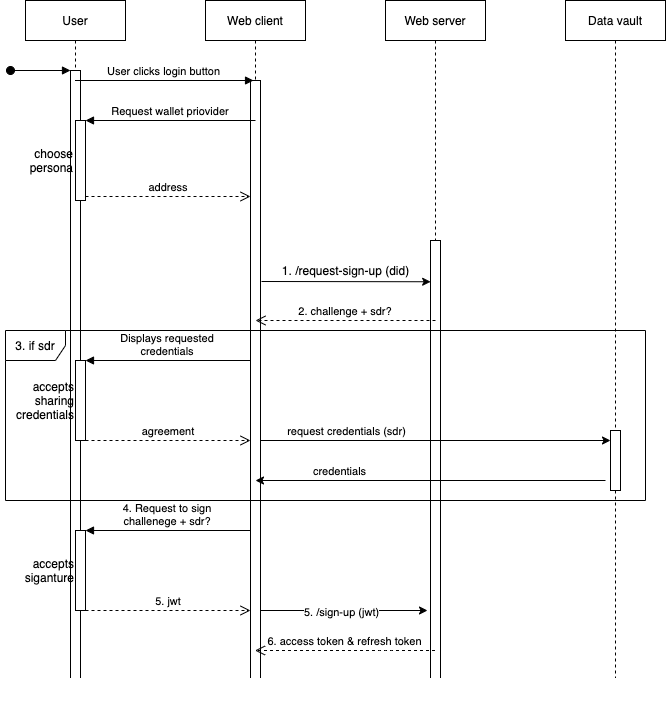
Sign up
Services usually register users before letting them in. This means the service requires some specific information to be shared by the user (ie: user’s email).
Requiring information to the user is OPTIONAL, it depends on the service needs. Some services may not need to register users before letting them enter in. This lets identify the service in one of the two groups: permissioned or open.
- Client sends
POST /request-signup { did }to Service, wheredidis User’s DID - Service creates a random deterministic* challenge. Responds with
{ challenge, sdr? }weresdr?is the OPTIONAL selective disclosure request defined by the Service. ThesdrMUST be sent in a signed JWT format. - If
sdr, Client obtains the information required from the user’s desired service or platform (for example, from the RIF Data Vault), and builds a selective disclosure (response) - Client pormpts user to sign a message with the following format using
personal_signas per EIP-19116 and EIP-15515 :Login to <web domain> Verification code: <challenge> My credentials are: <array of JWT credentials separated by commas>where
<web domain>is the site DNS domain and<array of JWT credentials>is the selective disclosure (which is set ifsdrwas asked*). For exampleLogin to taringa.net Verification code: 4531 My credentials are: eyJhbGciOiJIUzI1NiIsInR5cCI6IkpXVCJ9.eyJzdWIiOiJkaWQ6ZXRocjpyc2s6MHhjMmE0MWY3NmNhY2ZhOTMzYzM0OTY5NzdmMjE2MDk0NGVmOGMyZGUzIiwicm9sZSI6IlJJRiBEZXZlbG9wZXIiLCJpc3MiOiJkaWQ6ZXRocjpyc2s6MHg0Y2MxNzc0MjI2NDNjMzgxNGE5ZThhNzY1NDk4NTIxYzUyMDRmMTExIiwiaWF0IjoxNTE2MjM5MDIyfQ.3sauMI60RVqc1QrvooZnNnmjAMiHj4qt5ZSEYhOULvA,eyJhbGciOiJIUzI1NiIsInR5cCI6IkpXVCJ9.eyJzdWIiOiJkaWQ6ZXRocjpyc2s6MHhjMmE0MWY3NmNhY2ZhOTMzYzM0OTY5NzdmMjE2MDk0NGVmOGMyZGUzIiwic2tpbGxzIjoiQmxvY2tjaGFpbiIsImlzcyI6ImRpZDpldGhyOnJzazoweDRjYzE3NzQyMjY0M2MzODE0YTllOGE3NjU0OTg1MjFjNTIwNGYxMTEiLCJpYXQiOjE1MTYyMzkwMjJ9.SgPPVFj0lU9E_dq_aPOmrf_CZljNh1ZaEhAufAbIgFY - User signs the message with the DID controller’s private key. Client sends to Service
POST /signup {
  did: <signer's DID>,
  sig: <message signature>,
  credentials: <array of JWT credentials>
}
For the given example it is
{ "did": "did:ethr:rsk:0xa53...dec", "sig": "...", "credentials": [ "eyJhbGciOiJIUzI1NiIsInR5cCI6IkpXVCJ9.eyJzdWIiOiJkaWQ6ZXRocjpyc2s6MHhjMmE0MWY3NmNhY2ZhOTMzYzM0OTY5NzdmMjE2MDk0NGVmOGMyZGUzIiwicm9sZSI6IlJJRiBEZXZlbG9wZXIiLCJpc3MiOiJkaWQ6ZXRocjpyc2s6MHg0Y2MxNzc0MjI2NDNjMzgxNGE5ZThhNzY1NDk4NTIxYzUyMDRmMTExIiwiaWF0IjoxNTE2MjM5MDIyfQ.3sauMI60RVqc1QrvooZnNnmjAMiHj4qt5ZSEYhOULvA,eyJhbGciOiJIUzI1NiIsInR5cCI6IkpXVCJ9.eyJzdWIiOiJkaWQ6ZXRocjpyc2s6MHhjMmE0MWY3NmNhY2ZhOTMzYzM0OTY5NzdmMjE2MDk0NGVmOGMyZGUzIiwic2tpbGxzIjoiQmxvY2tjaGFpbiIsImlzcyI6ImRpZDpldGhyOnJzazoweDRjYzE3NzQyMjY0M2MzODE0YTllOGE3NjU0OTg1MjFjNTIwNGYxMTEiLCJpYXQiOjE1MTYyMzkwMjJ9.SgPPVFj0lU9E_dq_aPOmrf_CZljNh1ZaEhAufAbIgFY" ] } - Service receives the
responseand recovers the signer against this message (Service needs the User’s DID to fetch the expected challenge):Login to {SERVICE_EXPECTED_DOMAIN} Verification code: {EXPECTED_CHALLENGE} My credentials are: {response.credentials.join(',')}Then checks message signer matches
response.did’s address, and performs business logic over the selective disclosure. If business logic is successful, it logs the user in by creating an access token and a refresh token:- The access token is a JWT signed with the service controller DID’s private key. The JWT MUST have, at least, the following payload:
{
  iss: `${serviceDid}`,
  aud: `${serviceUrl}`,
  sub: `${userDid}`,
  exp: `${now + 10 min}`, // should be shorter than 15 minutes
  nbf: `${now}`,
  iat: `${now}`
}
Other claims could be useful for storing user metadata and other use case related information.
- The refresh token is an opaque string (could be a random one) that will be associated to user session data in the server. It has a long expiration
- The HTTP status is 200 and the body is
{ accessToken, refreshToken }
- The access token is a JWT signed with the service controller DID’s private key. The JWT MUST have, at least, the following payload:
*The credential format is not friendly for the user: they cannot understand what they are signing. Future work will research on finding a more user-oriented form to display the JWTs but with current technology this is what we can do. Ideally EIP-712 could be used to show display JWTs in user-oriented form.
See authenticating requests to understand how to user access and refresh tokens.
The selective disclosure request is optional and it depends on the service needs.
- Open apps need just a proof that the user is in control of the DID at the time of access. In that case the
challengeis enough - Permissioned apps need a proof that the user is in control of the DID and also proofs that the user fullfil the business needs when disclosing their information. IE: be older than 18 years old.
*The challenge may be non-deterministic, in that case, the service will have to store the challenges state. See How to calculate a deterministic challenge
Selective disclosure
It is strongly based on uPort implementation, where the service requires certain information and the user responds with it.
The selective disclosure request must be compatible with uPort DAF implementation, so it must implement the following interfaces.
Request
interface Claim {
  claimType: string
  claimValue: string
  reason?: string
  essential?: boolean
}

interface SelectiveDisclosureRequest {
  issuer: string
  subject: string
  replyUrl?: string
  claims?: Claim[]
  credentials?: string[]
}
issuer: the service did. REQUIREDsubject: the user did (the one received when requesting the challenge). REQUIREDreplyUrl: the sign up endpoint.claims: needed claims that may or not be part of a credential. IE:preferredLanguage.credentials: array of W3C Verifiable Credentials JSON Schema names. Those schemas definitions will be published in an open repository in Github. IE:EmailCredential,BirthdateCredential.
Response
interface SelectiveDisclosureResponse {
  issuer: string
  subject: string
  claims?: Claim[]
  credentials: VerifiableCredential[]
}
issuer: the user did. REQUIREDsubject: the service did. REQUIREDclaims: requested claims. IE:{ claimType: 'preferredLanguage', claimValue: 'english' }credentials: array of W3C Verifiable Credentials that implements the requested JSON schemas
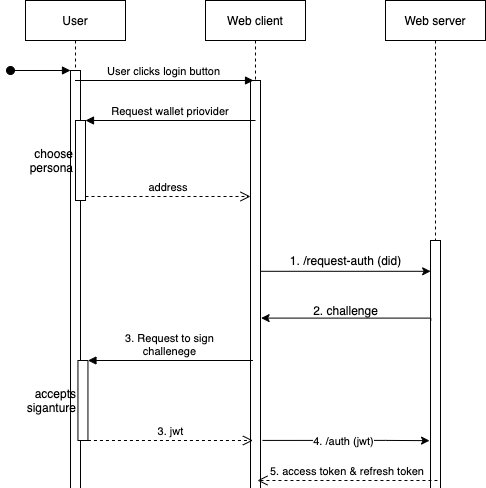
Login
Services should use login after registering users. This means the service already obtained the information required to let the user access the service.
- Client sends
POST /request-auth { did }to Service, wheredidis User’s DID - Service creates a random deterministic* challenge to send to Client and responds with
{ challenge }. - Client signs a message with the following format using
personal_signas per EIP-19116 and EIP-15515 :Login to <web domain> Verification code: <challenge>Client prompts the User to sign it with DID controller’s private key.
- Client sends to Service
POST /auth { did: <signer's DID>, sig: <message signature> } - Service receives the
responseand recovers the signer against this message:Login to {SERVICE_EXPECTED_DOMAIN} Verification code: {EXPECTED_CHALLENGE} My credentials are: {response.credentials.join(',')}Then checks message signer matches
response.did’s address. If necessary, performs business logic over thedidand the information related to it saved by the Service. If it is a valid user, it creates an access token and a refresh token - see (register to understand required token JWT payload format)
See authenticating requests to understand how to user access and refresh tokens.
*The challenge may be non-deterministic, in that case, the service will have to store the challenges state. See How to calculate a deterministic challenge
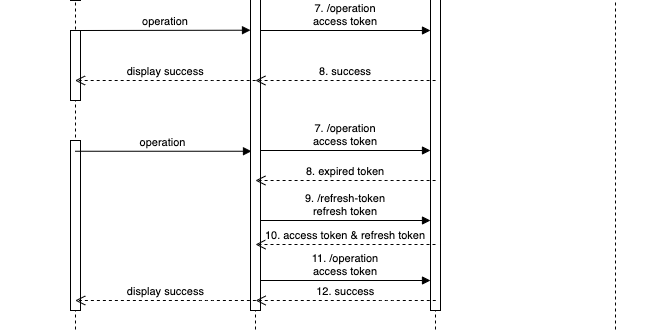
Authenticating requests
After the user is registered and has logged in (meaning the user is holding an access token and a refresh token) the flow for authenticating following requests is:
- Client authenticates next HTTP requests using the received access token. See how to send access tokens.
- Service receives access token. If the access token is not expired, it authorizes the request. If not, it answers with an HTTP 401 with
"Expired access token"string as HTTP body. - If Client receives HTTP 401, sends
POST /refresh-tokento Service including the refresh token. See how to send refresh tokens. - Service validates the refresh token and the current session status. If valid, issues new access token (with same data but new expiration), invalidates the received refresh token and issues a new one. The HTTP status is 200 and the body is
{ accessToken, refreshToken } - Client authenticates next HTTP requests using the received access token.
- Service authorizes the request.
Logout
This operation will invalidate the current user’s session. The next time /refresh-token is invoked, it will not generate a new access token.
- Client_s sends
POST /logoutwith the current _access token - If the access token is valid, Service marks the associated refresh token as logged out.
- Client sends
POST /refresh-tokento Service with therefresh token - Service does not refresh the access token because the session was closed before.
NOTE: The logout process does not invalidate the current access token, it will still be valid until it expires, that’s why it matters to implement short validity periods for access token. The logout just prevents the access token to be renewed.
Implementations
@rskmsart/express-did-auth- in progress
Extensions
- Separate authentication server from resource server. The goal is to differentiate the server that keeps the session data from the one that has the resources (API), so this last server could be stateless. By doing so, the user authenticates and refresh tokens with a Security Token Service that emits tokens can be used in another services that owns the business resources (ie:
/products) - Allow the user to express control of different identities in a private manner. Lets the user use different identities for a single registration
Open work
- Build a repository and define discovery method held by the client for W3C Verifiable Credentials JSON Schema definitions when
sdris requested - Abstract the protocol from the transport layer
Appendix
How to calculate a deterministic challenge
Calculate a deterministic challenge prevents the server to maintain a state of emitted challenges while those challenges are valid for a certain amount of time.
Example:
const challengeExpirationTime = 5min
const serverSecret = 'this is the server super secret'
const userDid = `did:ethr:rsk:0x0123456789abcdef`

const timestamp = int(now / challengeExpirationTime)

const challenge = keccak256(userDid-serverSecret-timestamp`)
By doing this, the challenge will be valid for the next challengeExpirationTime - now % challengeExpirationTime. Once the user sends the signed challenge back to the service, the server MUST perform the same calculation and the received challenge must be coincident with the result of that new calculation, if not, an invalid challenge response will be sent.
How to send tokens
There are different options to send the access token and the refresh token. Request headers, request body or cookies can be used depending on the case and the developer election, please find below the different descriptions.
NOTE: If you decide to use cookies, please make sure that your service is secure enough to prevent Cross Site Request Forgery (CSRF) atttacks.
Access token
Authorization Header
It must be placed in the Authorization header following the DIDAuth scheme. This scheme will be present in HTTP Authentication Scheme Registry14
.
For example:
GET /resource HTTP/1.1
Host: server.example.com
Authorization: DIDAuth my.access.token
Cookie
When the client performs a POST /auth, the server must set the authorization cookie with the following attributes: HttpOnly, Secure and SameSite=Strict (this new attribute prevents CSRF, but it is not supported by all the browsers yet). See more information about cookies here
For example:
Set-Cookie: authorization=my.access.token; Secure; HttpOnly; SameSite=Strict
Then, the client browser will send the cookie on every request.
Refresh token
Body
It must be placed in the body of the request as a refreshToken field.
For example:
POST /refresh-token HTTP/1.1
Host: server.example.com

{
  refreshToken: 'theRefreshToken'
}
Cookie
When the client performs a POST /auth, the server must set the refresh-token cookie with the following attributes: HttpOnly, Secure and SameSite=Strict.
For example:
Set-Cookie: refresh-token=theRefreshToken; Secure; HttpOnly; SameSite=Strict
Then, the client browser will send the cookie on every request, so when the client makes a POST /refresh-token, the server will replace the existing cookies (authorization and refresh-token) with new values.